How to Shoot a Basketball Perfectly (10-Step Guide)
Every young basketball player grows up wanting to learn how to shoot a basketball at a world-class level.
This is obvious to anyone who steps foot into a gym.
The first thing you'll look around and see our players as young as 5-years-old throwing up shots from behind the three-point line.
With the rise of players like Steph Curry and Damian Lillard, as well as the game of basketball developing to take more advantage of the three-point shot, learning how to shoot a basketball at a high level has never been more important.
There's only one issue with this...
Becoming a great shooter isn't an easy thing to do!
When I was a lot younger, I remember spending hundreds of hours in the backyard of our family home trying to perfect my shooting form.
I would sit in front of the TV and memorize the shooting techniques of my favorite player and then sprint outside and try to recreate it.
I would watch instructional shooting videos trying to diagnose the problems with my jump shot and then fix them.
Over time, I was able to improve a lot.
But as I started getting older and playing for different coaches, I kept running into obstacles in regards to my basketball shooting form...
Every coach wanted me to shoot the basketball a different way!
- Some coaches wanted me to dip the basketball. Some didn't.
- Some coaches wanted me to focus on the front of the rim. Some didn't.
- Some coaches wanted me to completely face the rim. Some didn't.
As soon as I'd become comfortable with one variation, another coach would step in and demand I change it.
It's nearly impossible to become a consistently good shooter when you're constantly making these changes.
And that's why I created this 10-step guide...
My goal with this article is to clear up all confusion when it comes to learning how to shoot a basketball at a high level.
I'm going to give you detailed, step-by-step instructions on exactly how players should be shooting the basketball.
How to Shoot a Basketball Perfectly in 10 Steps
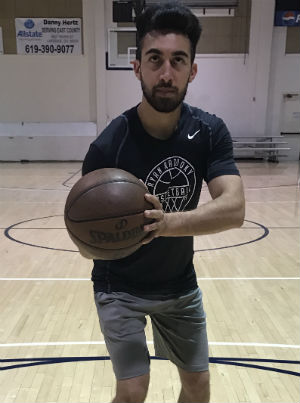
Step #1 - Shot Preparation
Being a great shooter starts before you receive the basketball.
This step is often overlooked by most players and coaches but can be the difference between having enough time to take a good shot or getting your shot blocked by a defender closing out.
"You don't shoot fast. You get ready to shoot fast" - Don Meyer
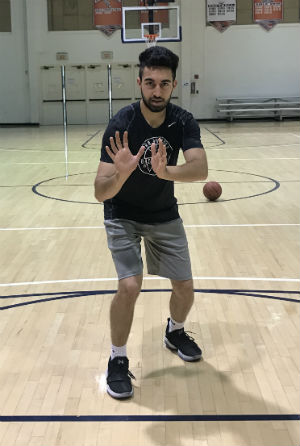
Here are the three rules to make sure you're prepared to shoot when you catch the basketball...
a. Start with your knees and hips slightly bent
If you catch the basketball with straight legs, it will take extra time to bend your legs before raising up for your shot.
This is too slow.
b. Show target hands
Showing target hands to the player with the basketball shows them exactly where to pass to your shot pocket (we'll talk about this later).
c. Be mentally prepared to shoot
You'll never be more open than when you first catch the basketball.
As long as you're within your comfortable shooting range, you must be mentally prepared to shoot on the catch.
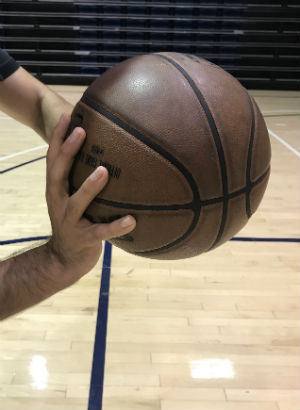
Step #2 - Hand Placement on the Ball
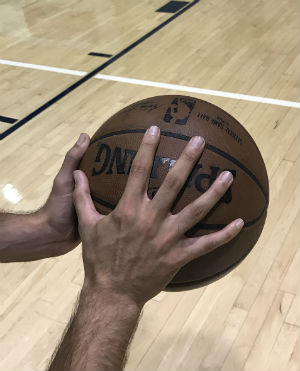
Upon catching the basketball or raising up into a shot, players must be able to quickly adjust their hands to the correct positions on the basketball.
The shooting hand must be under/behind the basketball and the balance hand should be on the side of the basketball.
The thumb of your shooting hand and the base of the thumb on your balance hand should form a 'T' (as pictured).
All finger pads and hand pads should be touching the basketball.
The only area of your shooting hand not touching the basketball is the small gap in the middle of your hand.
Another important but overlooked detail is that the fingers should be spread comfortably wide on the basketball.
These adjustments must happen immediately upon receiving the basketball.
Step #3 - Balanced Base
"The key to being a good shooter is balance. Everything follows balance" - Larry Bird
Most players and coaches believe that shooting success is mostly to do with the movements of the upper body...
This is far from the truth. Great shooting always starts with the base.
If a player can't get the base of their shot correct, then it's very hard to become a consistent shooter.
A balanced base involves three important factors...
a. Feet slightly narrower than shoulder-width apart
If your feet are too narrow, it's very difficult to stay on balance when raising up for the shot.
If your feet are too wide, you won't get enough lift in your shot.
(Have a photo showing too close, perfect, too wide.)
b. Dominant foot slightly in front
When combined with the next step (the turn), this will improve the balance of your shot and release tension in your shoulder.
For right-handed shooters, this means sliding the right foot forward slightly. The opposite for left-handed shooters.
c. Weight equally distributed on each foot
For obvious reasons, a player should not be leaning to either side when taking a shot.
Your weight should be equally distributed on both feet.
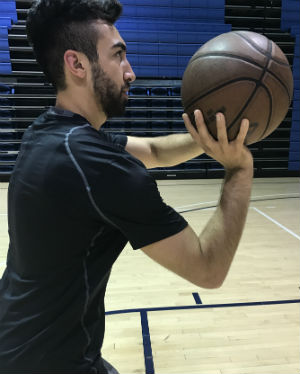
Step #4 - Feet Direction (The Turn)
I could have included this in the 'balanced base' section above, but I feel that this is so important it deserved its own step.
When shooting the basketball, a player's feet should be turned slightly.
For right-handed shooters, their feet should be turned slightly to the left (11 o'clock).
For left-handed shooters, their feet should be turned slightly to the right (1 o'clock).
To understand why this is important, stand at the free-throw line with all 10 toes pointing towards the rim.
If you attempt to keep your elbow lined up with the rim while shooting with this base, you'll notice that tension is required in the chest.
To relieve the body of this tension, players should turn their feet slightly which will allow their elbow and shoulder to line up with the rim more comfortably.
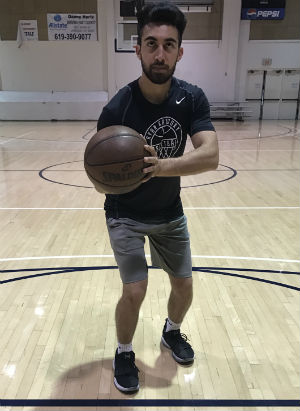
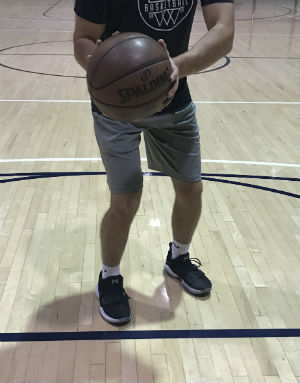
Step #5 - Consistent Shot Pocket
The 'shot pocket' is the area a player is most comfortable starting the basketball from when beginning their shot.
This will usually be around the lower chest or stomach area of a player and will either be usually be in the middle of their body or slightly to the shooting hand side.
All players must find what feels comfortable for them.
Each time a player catches the basketball to shoot, they should be bringing the basketball back to their shot pocket before raising up into their shot.
There are two main reasons for this...
- Keeping a consistent shot pocket ensures players are shooting the basketball the same way every time they shoot.
- Since the shot pocket is often low, this will give player much better rhythm as they go up for their shot.
Will there be time when players don't have time to return the basketball to their shot pocket? Sure...
But they'll shoot better when they do.
Step #6 - Eyes on the Target
A while ago I asked 15 shooting coaches which part of the rim they encouraged players to focus on when shooting.
The answers were surprising...
Many of the shooting coaches were teaching their players to aim for different targets on the rim... Yet all of them were able to develop great shooters.
"What does this tell us?"
There isn't one 'correct' target to focus on when shooting.
Players have a number of options...
- The center of the front of the rim.
- The center of the back of the rim.
- The first loop in the net.
- The entire hoop.
- etc.
Whichever target you decide to use, this is the most important thing you must keep in mind at all times...
Once you find a target you're comfortable with, be consistent.
'Front-rim shooters' and 'back-rim shooters' are focusing on targets which are 17 inches (45cm) apart aiming to achieve the same goal.
If you're constantly changing the target you're aiming at, it's nearly impossible for you to become a consistent shooter.
You have to pick one and then allow your shot to develop using that target.
Step #7 - Wrinkle the Wrist
Shooting with a straight wrist is another one of the most common problems for youth players.
Players who do this will often push the basketball towards the rim (flat shot) instead of shooting the basketball up and through the rim.
Fortunately, it's a simple fix with a visual cue.
The aim of this step is to get the wrist of the shooting hand bent back as far as possible (usually a little before 90 degrees).
This will give extra power to the shot and will also create the necessary backspin required to be a good shooter.
When bent back correctly, there will be small wrinkles in the skin on the back of the shooting wrist.
This provides a convenient visual cue for players to know if they're bending their wrist back correctly before shooting.
Step #8 - Elbow Under the Basketball
When you're raising up for the shot, the elbow of your shooting arm should be directly under the basketball.
This requires players to have their upper and lower arm forming an 'L' shape and also have their wrist bent back to 90 degrees (step 7).
Doing this will ensure that the basketball will be shot in a straight line to the rim and also have good backspin.
Players who flare their elbow out while shooting will often miss to the left or right because they're not shooting the basketball straight.
A player will often flare out their elbow when they don't turn their feet correctly (step 4).
This is because the chest requires uncomfortable tension to pull in the elbow when 10 toes are pointing towards the rim.
Step #9 - Balance Hand
The 'balance hand' is what we call the non-shooting hand.
As the name implies, its only role during the shooting motion is helping to balance the basketball on the shooting hand up until the release point.
For right-handed shooters, this is the left hand.
For left-handed shooters, this is the right hand.
If you've been around basketball long enough, you'll often hear this hand referred to as the 'guide hand'.
I don't like this terminology as this hand should never 'guide' the basketball anywhere during the shooting motion.
There should be no force from the balance hand when a shot is taken.
As the elbow starts to extend in the shooting motion, the balance hand releases flat off the side of the basketball.
If the balance hand isn't flat on release, this means that a player has pushed the basketball with their balance hand (most often with their thumb) while in the shooting motion and the shot will usually end up missing left or right.
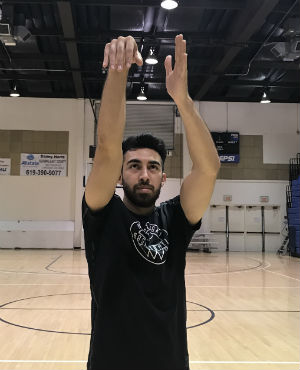
Step #10 - Rhythm Shot + Follow Through
The final step is where it all comes together...
Shooting with rhythm involves many parts occurring simultaneously:
- The basketball is lifted up from the shot pocket.
- The knees and hips straighten out as the player raises themselves into the air for power.
- The elbow of the shooting arm straightens up in the air once the basketball has been lifted past shoulder height. (To check if you're shooting the basketball up into the air at the correct angle, make sure that the elbow of your shooting arm finishes next to your eyebrow on the follow through).
- Near the peak of the shot, the wrist is snapped in the direction of the rim so that they fingers are pointing towards the ground. This will ensure the basketball has good backspin resulting in a 'soft' shot.
- Also at the peak of the shot, the balance hand will release from the basketball keeping perfectly flat. This ensures the balance hand isn't pushing the basketball.
- The final two fingers to touch the basketball should be the index and middle fingers at the same time.
- When you return to the ground, the rhythm of your jump shot will have guided your body forward slightly of where you took off from.When practicing, I encourage players to hold this form until the basketball has hit the rim so that they can look up and evaluate their technique.
PREVIOUS: Must-know the Difference Between Compression Tights and Leggings
Leave a comment